Saturday, May 19, 2012

Summer Fun Plan

Okay, here it is, after much researching the web, surveying friends, pulling together all the resources I already have, I finally have a plan for summer fun for the kids. Last summer we did home school complete with color coded days of the week folder and worksheets and a schedule of activities. This summer we're taking a different approach. I'm still planning on keeping a routine because my kids act better when they know what to expect and it keeps them busier so they don't whine all day that they're bored and having nothing to do.


You can print a free copy of my generic schedule here and I have linked the other activities throughout this post if you would like to use them. It goes something like this.


7     TV or play until Breakfast & Devotion
8      Brain Games
10    Play Outside
11    Lunch
12   Monday = Craft Project
       Tuesday = Library
      Wednesday = Cooking
      Thursday = Service Project
      Friday = Go Somewhere Fun
2     Free Play
4     Tidy Up
5    Dinner
6    Play with Dad
8    Bath, Books, Bed

In case you are wondering "Brain Games" was my idea of calling educational activities something more fun than homework. I printed these tokens that list educational games and activities some on the ipod, some actual games, some from workbooks. I cut them out using a 1.5" circle punch and also cut out circles from free paint chips, glued them together and laminated. Allowing the kids to pick their own colors of paint chips helps distinguish which ones are level appropriate for them and also separates language and writing activities from math. They will each draw one token from each color group (1 language, 1 math) and do the activity during Brain Games time. I will work with them on their activities but this allows them to feel like they have some choice on what they get to do instead of me just dishing out the worksheets all summer.

Each afternoon we have a different project each day. I won't take time to retype them all since you can print the complete list of crafts, recipe ideas, service projects, and fun places to go. Many of them were inspired by things I pinned on Pinterest. You could add hundreds of things you could do with your family just by doing a quick search of "family fun" at Pinterest.

So that's my plan. It's really not as complicated as it may look. I encourage you to make your own plan so you can be prepared for the kids being home all day. Even planning the daily project activities in advance allows you to make sure you have all the supplies so you're not having to cancel the fun or make a rushed trip to the store with kids in tow to get stuff. Also, by the time I factor in Vacation Bible School, swimming lessons, drama camp, and vacation, I'm really only planning about 6 weeks worth of stuff to do. Pretty easy to do when you've got a plan and makes life so much more joyful!

Friday, May 18, 2012

Our Gilded Son

This mama has to brag on her finished first grader who received awards today for all A's honor roll all year, perfect attendance all year, certificate in reading (having met reading goals), and Champion of Conduct all year. We are so proud of you!


Thursday, May 17, 2012

Summer Bible Study

Just three more days of school for the kiddos and our church has already ended mid-week activities for the kids. Summer break is fast approaching and I NEED A PLAN! 


Right now I'm brain storming some ideas for the kids which I will share with you soon, but in mean time I'm putting my priorities in order and making a plan for my own Summer Bible Study. 


Currently, our church offers ladies Bible study twice a year in the fall (Aug-Oct) and then spring (Jan-March here). That's just not enough. I don't want to be the kind of Christian who only takes my Bible off the shelf on Sundays and Tuesdays when there's a class twice a year. I teach 3 and 4 year olds in Sunday School but preparing to teach them doesn't fulfill my need for adult level Bible Study if I'm serious about wanting to go deeper still. 


I Saw the Lord: A Wake-Up Call for Your HeartA while back a friend (and mentor) invited me to a Bible Study in her home between church led classes that changed my life. It was "I Saw the Lord" by Anne Graham Lotz. The study was tremendous but even more important was the tool I gained for learning to study the Bible for myself. I grew up in the church, became a Christian at an early age, married a pastor but I wasn't really digging into the Bible on my own as I should. I attend church regularly, I read my devotion magazine or a devotion book with the verse at the top and then one page of someone else's commentary and a prayer. I guess I felt like I didn't know where to start. This is where you start! 


Pick a familiar Bible story or character you want to know more about. Find it in the Bible and then use the Bible Study Guide I made to really study it. Here's how it works in summary. If you want to know more you can begin where I did by reading "I Saw the Lord" and doing the participants guide. First Read God's Word and write it in the Read column. You can go verse by verse or just select a key passage to study in depth. I just finished doing the book of James this way and I did not list every verse. I read one chapter at a time, looked for themes and asked myself, "what is this chapter really about, what are the key messages here?" Write down a few key verses. Then List the facts in the next column. Try not to just re-write the scripture but list the facts about who is speaking, where, to whom? Next, Learn the lessons from the scripture. Ask yourself what does this mean for me? Finally, Listen to God's voice. Take some time to pray as you reflect on the passage you've studied and ask God what He wants you to do with what you've learned. Anne Graham Lotz uses a fifth step called live it out but I combine that with Listen in my homemade chart because I want to already be committed to say "Yes" when God speaks. I use the Listen column to record anything the Lord is asking me to reflect on (self-evaluate) or DO.


Don't get discouraged, just be faithful to stay in God's Word. James only has five chapters yet it took me several months to complete because there were so many familiar key verses I didn't want to skip over it took me more than one day per chapter. Last summer I did the book of Hosea this way and learned SO much! This summer my husband is going to join me in studying the book of Daniel this way. I have a confession that over this school year I've gotten used to doing my Bible Study in carpool line. Yes, I'm an early bird who leaves the house 30 to 45 minutes before my son gets out of school so I can have extra quiet time in the car. My younger son sleeps, watches a movie, or plays ipod (usually) and I sit with my Bible in my lap and my notebook on the steering wheel and study away. Now that carpool line is just about over for the summer I have to come up with a new plan or I'll never fit it into the day. The days just have a way of slipping away with other activities when you've got small kids at home. 


So here's my plan. I know your thinking I'm crazy, cause I do to a little. Just when kids and moms get to sleep later because school's out I'm going to make an effort to get up earlier (yes, earlier) and do my Bible Study. Now everyone else in my family are morning people anyway. The kids hardly ever sleep past 7am no matter how late they stay up at night. I however, like the snooze button. So we'll see how this goes. I read something on another blog about waking up for your children instead of waking up to your children. If you're talking about living out your faith in front of your kids so they they are influenced by what they see you do instead of just what you say to do, well, what better way than for them to wake up to see you reading your Bible? I'm praying for the strength and discipline needed to do this. I might need a little Mandisa Good Morning to get me outta bed though. 


Monday, May 14, 2012

My Mother's Day

I got to spend Saturday night with my boys at a mother & son outing to the ballpark to watch the New Orleans Zephyr's play baseball. Sunday was a fun day at church as I got to teach 4 year olds and our church dedicated 15 babies & their parents to the Lord. Then we came home and played, napped, ate, and went to ride bikes at the park. Here are my sweet and thoughtful gifts from the kids and my husband.
A rose from the rosebush they gave me for Mother's Day 2 years ago - still blooming faithfully!

A painting from scripture.

Handprint card and poem made at church.

Wow Mom card made in Sunday School.

Letter my 1st grader did at school. This is so funny. By the way, I am NOT 44 years old, 1,500 pounds or 50 cubics tall!
Cubics, Really?


Look Mom, No Training Wheels!

Such a big kid now that he's riding with no training wheels. Really fast too!


And now with a bigger bike!

I Love Cupcakes!

Happy 1st Birthday BG!


Saturday, May 12, 2012

10 Mother's Day Gifts Under $10


When I was a new mother, my husband didn’t know he was supposed to get me a mother’s day gift from our new baby. After all, I’m not his mother. But as the mother of our children I wanted to celebrate motherhood. Since then, he and our boys have come up with some pretty amazing and memorable mother’s day gifts. 


So if you’re a dad who has waited until the last minute, or didn’t know you were supposed to do something for the mother of your children, here’s a list of 10 things for under $10 each that every mother would love to get. If you’re a mom reading this and have a sneaking suspicion that your hubby or kids forgot, email this link to them as a little hint. 


rose bushJust about every woman loves flowers. Sure you could pick up a bouquet of roses at the drug store with your Sunday newspaper and she would love them for about a week until they die and she has to throw them out and clean the vase. Or you could buy her a rose bush for under $10 in her favorite color that you could plant for her and let her enjoy for years to come. My boys each gave me a rose bush two years ago and I still see and love them every time I pull in the driveway. 


One thing no mom should be without is a tape dispenser. I know this sounds a little quirky but trust me, if she doesn’t have one she needs it! You’ve probably heard mom say she felt like she needed 4 hands when wrapping presents, taping kid’s projects, etc. Well, a tape dispenser solves any tape emergency by allowing her to quickly dispense tape with a single hand and the tape doesn’t stick to itself causing a tape disaster as it takes forever to find the end of the clear tape. A good little tape dispenser costs around $4 to $8 at any office supply store or Wal-Mart. 


family fingerprint charmSure you see a zillion commercials for jewelry stores selling fancy mom necklaces and charm bracelets around Mother’s Day but how often do you really see women wearing this stuff the rest of the year? I love things that are homemade and on Mother’s Day homemade jewelry is no exception. Whether you have a toddler who can string fruit loops and macaroni or you want to try your kids hands at clay finger print charms the options are only limited to your imagination. No imagination? A quick browse of handmade jewelry at pinterest or Etsy should give ample inspiration. Visit your local craft supply store for ideas and instructions.


If organization is her thing, get her some gorgeous and practical glass canisters. These are both beautiful and good for the environment being made of recycled glass. She could use these for storing food, craft supplies, sewing supplies, snacks, beauty items, or just about anything else. Don’t want to give her an empty jar? Fill it up with her favorite chocolate. Every woman needs chocolate! Delicious dark chocolate is even heart healthy! Like I say, a truffle a day keeps the grumpies away! My husband’s probably thinking he should buy me a lifetime supply then (lol)! 


tea party giftEspecially when a mom is the only girl in the house or is outnumbered by boys, candles make a nice sweet smelling gift. Just make sure it’s a light, girly, floral scent and not something that smells like food, laundry detergent, or bathroom cleaner. That would only remind her of stuff she has to do every day. The opportunity to make even one room in the house smell fresh and feminine will do wonders to cheer her up. You could even try homemade candles if she has some that have burned the entire wick but left the wax. Melt down the remaining wax over low heat in a dollar store pot (not her best cookware) pour it into a pretty glass or tea cup add a new wick and ta-da it’s an up cycled candle!


Re-useable grocery bags are becoming more and more trendy as moms are looking to be more eco-friendly. Another great homemade project for under $10 is canvas bags. You can find these plain at the craft section at Wal-Mart or any craft store and a set of fabric markers is all you need to make a gift that will last and last. Have the kids draw a picture, trace their hands, or write their names. Be sure to put the year on them somewhere as these bags will far outlast the kids wanting to draw sweet pictures for mom. Simply put them in the drier for a few minutes when they finish to “set” the ink and they are ready to give. What a great way to make her smile every time she’s shopping for the family and sees her kids’ sweet drawings. 


Aprons are a very retro inspired gift. I love wearing aprons at home. It’s kind of like the uniform of a homemaker who loves her job. Pretty aprons are everywhere. You could spend $20-$30 on beautiful aprons at Anthropology or Sur LaTable or World Market. Or you could shop antique stores to find a real vintage apron for less. Even cheaper for under $10 you could have your kids color her an apron (same as the canvas bags). 


You could give mom an expensive 30 minute spa treatment or you could get her some new towels to make her have that spa-like feeling every day. Really, what’s better than starting your day with fresh fluffy towels after a warm shower? It’s the little things that make a big difference. Fresh new towels to replace the stained, hole worn, towels you got when you were married ** years ago are well, a good thing. 


Going along with that spa theme is another great gift just for mom – pajamas. I’m talking about the oh so soft cotton jammies or gown (whichever she prefers) that she wishes she could stay in all day. Refrain from buying anything with words on it – she’s used up all her words by bedtime and just wants some peace and quiet! Go for cute, modest, and comfortable, not valentines lingerie or teen style boxers & cami’s. My husband picked out pj’s from the kids last year and I still love them! Good quality cotton lasts and lasts.


So that’s my list of suggestions. Most of all be sincere and remember to tell her you love her not only for all she does but also for who she is. 


1. Flowers that grow 
2. Tape dispenser 
3. Homemade jewelry 
4. Glass canisters 
5. Chocolate! 
6. Candles 
7. Canvas bags 
8. Apron 
9. Towels 
10. Pajamas

Wednesday, May 9, 2012

Handy Homemaker Tip #1

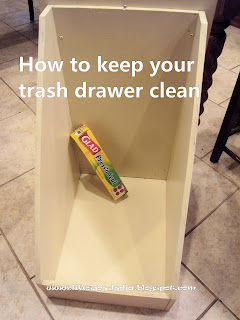
Many homes now have trash can drawers in the kitchen. I love having a dedicated and contained space for the kitchen garbage, however..... well, it gets gross! In fact, I'm too embarrassed to make a "before" picture of what mine looked like before I spent a half and hour scrubbing on it. Let's just imagine beige pained wood drawer splattered with ketchup, BBQ, half eaten chicken nuggets, gum and a yogurt cup that missed the can. Yuck!

In searching every store imaginable I have not found a trash can that perfectly fits my storage drawer so I use a plastic one that fits vertically and leaves room on the sides to get the trash bag on and off but slides around when the drawer is open and closed. AH HA! Right there's the problem because when in slides to the back of the drawer and tiny tot (or any of us) opens the drawer to throw away his sticky candy he can't see over the top of the drawer and thus just throws it in, missing the can.

I have tried lining the bottom of the drawer with paper towels, foil, and wax paper but they all just end up all bunched up and covered in goo because of the sliding can problem. Here's the cheap and quick fix - Glad Press & Seal! You can buy a roll at the local grocery store for around $3 a roll. It is slightly sticky on the back which means it won't slide around and get all bunched up. I got a little carried away and lined the bottom and sides of the trash drawer and the bottom of the cabinet the drawer goes in. It took about 10 minutes which is a lot less time than it took me to clean it. When it gets dirty just peel it off and toss it and cover it with clean press & seal.

This was inspired by a picture (below) that I saw on Pinterest where someone used this stuff to line their refrigerator shelves for the same reason. It's cheaper that shelf paper and your not stuck with duck print plastic that peals off the paint when you want to remove it.
Line fridge shelves with Saran Wrap’s Press and Seal paper, then peel off and replace when dirty.  Genius!
pinned from Jen Rupnow via Stephanie Angrisani  Worthington